Painted Pillows
Did you see the post about painting on fabric? Just check my "Creating With Fabric" board and look for the WATERCOLOR PILLOW project.
I went to the source (you can click the BUTTON and it will take you to the post) and decided to try it another way. Being the spontaneous person that I am, I never even thought to take photo's of my steps because I wasn't sure how they would turn out. Oh well...I think you'll be able to get it with just some basic instructions.
I used some scrap white fabric I had in my stash. Nothing special, but it was really soft and probably in the $8 per yard price range. I took the fabric and tore off a piece...no measurements or anything...just a piece to play with.
Next, I found a few designs on some of my Pinterest boards that I liked and drew them with a BLACK SHARPIE onto the white fabric. So far, I've followed the same path as the original post. But I didn't want to color on the fabric with SHARPIES or FABRIC MARKERS! Too much trouble and I didn't like the colors...too much like a box of crayons. SO...I use my colored inks. You may not own these and they can be quite an investment. However, you could create just about any color you wanted just by getting the 3 PRIMARY COLORS: a red or magenta, a blue or turquoise, and a yellow. Remember your elementary art? Mix red with blue and you get purple. Blue with yellow equals green. And yellow and red combine to make orange. So, with those 3 shades you could have a blast!
I suggest heading to HOBBY LOBBY or MICHAEL'S and buying Dr. Ph Martin's Bombay India Inks. You can purchase the individual glass bottles with droppers for about $5 each; you'll find them in the "art supply" section. Moving on...
So, I've drawn (2) different designs using a black sharpie onto the white fabric and have them on FREEZER PAPER to protect my table. Keep a box of freezer paper around...you'll use the stuff for everything! You find it with the Reynolds Wrap, Wax Paper, etc. at Wal-Mart. ANYWAY, I poured some RUBBING ALCOHOL in a small spray bottle so it would be ready when I needed it.
Using the dropper from the ink bottle, I just started adding drops on the fabric making sure to have some drops close together so that the colors would bleed together to make ANOTHER color. Because fabric has a coating on it the ink just beaded up...until I sprayed it with the alcohol! Maybe I'm just strange, but it was SO MUCH FUN to watch those colors spread out and bleed into each other! Not only that, the black sharpie lines bled a little too.
I decided to stop at that point and let my little project dry for a while.
After it was fairly dry I decided I wanted some "shazam!" So, I dug through my art stuff and found a bottle of METALLIC GOLD TEMPERA PAINT. I used my fingers and just smeared it on...nothing like finger painting to make you feel young again. The effect was exactly what I was looking for. Again, it was time to walk away and let both of my designs dry.
Once the "paintings" were pretty dry (I'm very impatient...have I told you that yet?) I decided to HEAT SET THE COLOR WITH MY IRON. The colors faded a bit once heat-set, but that metallic gold made up for any loss of color.
I went back over the black sharpie lines and ironed the fabric again. You can also throw your work in your clothes dryer...just make sure it's already completely dry and there is nothing else in your dryer! Set your dryer on HIGH HEAT for about 30 minutes and you're good to go. This will set your paint FOR SURE!!
You're finished! Sort of.
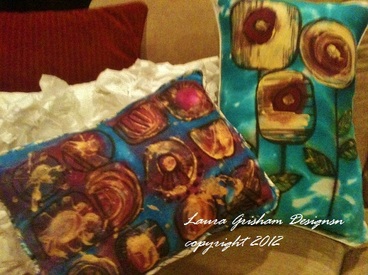
You can frame your work or do like I did and make pillows. I just found more fabric in my stash that complemented the paintings, cut the painting and fabric the same size, and sewed the two pieces together with PIPING sandwiched between the two. Then, I turned them right side out, stuffed them with POLY-FIL pillow stuffing, hand-stitched the stuffing hole closed and I had myself two really GROOVY pillows!
This is really an easy project. And you can paint as many as you want at one time, let them all dry, and then make them into pillows or framed art whenever you have the time. I gave the two I made to my niece, Sarah, for her birthday. Kevin liked them so much he wants me to create more for the ladies at work for Christmas! Needless to say, I was thrilled.
Now...when January arrives maybe I'll have the time to create some for MY house!
Happy Holidays,
Mrs. Art Lady...aka...Laura
P.S....comments, suggestions and question are AWESOME!
I went to the source (you can click the BUTTON and it will take you to the post) and decided to try it another way. Being the spontaneous person that I am, I never even thought to take photo's of my steps because I wasn't sure how they would turn out. Oh well...I think you'll be able to get it with just some basic instructions.
I used some scrap white fabric I had in my stash. Nothing special, but it was really soft and probably in the $8 per yard price range. I took the fabric and tore off a piece...no measurements or anything...just a piece to play with.
Next, I found a few designs on some of my Pinterest boards that I liked and drew them with a BLACK SHARPIE onto the white fabric. So far, I've followed the same path as the original post. But I didn't want to color on the fabric with SHARPIES or FABRIC MARKERS! Too much trouble and I didn't like the colors...too much like a box of crayons. SO...I use my colored inks. You may not own these and they can be quite an investment. However, you could create just about any color you wanted just by getting the 3 PRIMARY COLORS: a red or magenta, a blue or turquoise, and a yellow. Remember your elementary art? Mix red with blue and you get purple. Blue with yellow equals green. And yellow and red combine to make orange. So, with those 3 shades you could have a blast!
I suggest heading to HOBBY LOBBY or MICHAEL'S and buying Dr. Ph Martin's Bombay India Inks. You can purchase the individual glass bottles with droppers for about $5 each; you'll find them in the "art supply" section. Moving on...
So, I've drawn (2) different designs using a black sharpie onto the white fabric and have them on FREEZER PAPER to protect my table. Keep a box of freezer paper around...you'll use the stuff for everything! You find it with the Reynolds Wrap, Wax Paper, etc. at Wal-Mart. ANYWAY, I poured some RUBBING ALCOHOL in a small spray bottle so it would be ready when I needed it.
Using the dropper from the ink bottle, I just started adding drops on the fabric making sure to have some drops close together so that the colors would bleed together to make ANOTHER color. Because fabric has a coating on it the ink just beaded up...until I sprayed it with the alcohol! Maybe I'm just strange, but it was SO MUCH FUN to watch those colors spread out and bleed into each other! Not only that, the black sharpie lines bled a little too.
I decided to stop at that point and let my little project dry for a while.
After it was fairly dry I decided I wanted some "shazam!" So, I dug through my art stuff and found a bottle of METALLIC GOLD TEMPERA PAINT. I used my fingers and just smeared it on...nothing like finger painting to make you feel young again. The effect was exactly what I was looking for. Again, it was time to walk away and let both of my designs dry.
Once the "paintings" were pretty dry (I'm very impatient...have I told you that yet?) I decided to HEAT SET THE COLOR WITH MY IRON. The colors faded a bit once heat-set, but that metallic gold made up for any loss of color.
I went back over the black sharpie lines and ironed the fabric again. You can also throw your work in your clothes dryer...just make sure it's already completely dry and there is nothing else in your dryer! Set your dryer on HIGH HEAT for about 30 minutes and you're good to go. This will set your paint FOR SURE!!
You're finished! Sort of.
You can frame your work or do like I did and make pillows. I just found more fabric in my stash that complemented the paintings, cut the painting and fabric the same size, and sewed the two pieces together with PIPING sandwiched between the two. Then, I turned them right side out, stuffed them with POLY-FIL pillow stuffing, hand-stitched the stuffing hole closed and I had myself two really GROOVY pillows!
This is really an easy project. And you can paint as many as you want at one time, let them all dry, and then make them into pillows or framed art whenever you have the time. I gave the two I made to my niece, Sarah, for her birthday. Kevin liked them so much he wants me to create more for the ladies at work for Christmas! Needless to say, I was thrilled.
Now...when January arrives maybe I'll have the time to create some for MY house!
Happy Holidays,
Mrs. Art Lady...aka...Laura
P.S....comments, suggestions and question are AWESOME!